Showing posts with label ham. Show all posts

Saturday, April 18, 2015

Crunchy Croque Monsieur

A Croque Monsieur is an inside-out grilled cheese!

I've been chowing down on this famous French sandwich since we moved here and I'm so pumped to share it during Grilled Cheese Month 2015.

Viola Le Croque Monsieur: an inside-out grilled cheese!

Croquer means 'to crunch' and the loud crunch it should make when you bite into it is how it got its name. Like the other great French sandwiches I've enjoyed, it has super simple ingredients: bread, ham, emmental cheese, for the inside, and melted Gruyere cheese on top.  

The tricky part of making this at home was finding the right bread. The beautiful artisan breads I love are also very holey, which isn't ideal for a grilled sandwich. Luckily, bakers are like pharmacists, since there are as many pharmacies here as there are bakeries, and if you go to one with a question, they can help you get what you need. So I went to the new bakery that just opened behind our house for some expert advice. The result was a very small, square loaf of bread, plucked fresh from the shelf. The slices were no bigger than small ceramic tiles in a bathroom, so I knew it would be a multiple Croque Monsieur meal.


Small bread makes a tasty, crunchy Croque Monsieur.
To create your own Croque Monsieur, you will need:

-Non-holey bread
-Ham
-Emmental cheese
-Mustard (optional, but you know how I feel about my spicy mustard!)
-Gruyere cheese for the top

Prep:

  1. Spread mustard on one slice of bread.
  2. Top with ham and slices of emmental.
  3. Assemble the other piece of bread.
  4. Sprinkle a thick layer of grated Gruyere on top.
  5. Bake in a pre-heated oven or toaster oven for 10 minutes/until the top is nicely melted and golden.  

Any kind of grilled cheese, inside and out, is a big favorite of mine but I can't deny that all that melted cheese alone is not super healthy. So I paired my Croque Monsieurs with another crunchy dish, a fresh Broccoli Salad, for a tasty serving of veggies and sweet fruit. 

Equally crunchy Broccoli Salad with apples and dried cranberries.


Prep for the Broccoli Salad:
  1. Rinse the broccoli and chop into bite-sized florerets.
  2. Chop up an apple and toss in a big handful of dried cranberries.
  3. Sprinkle with some grated cheese and toss in a cream dressing (to make a quick one, add some milk, white sugar and ground pepper to a big dollop of mayo and mix until thin.)
Mmm..crunch! What a lovely sound! The spicy mustard really made this Croque Monsieur pop! 

My stack of Croque Monsieurs was a great opportunity to break in my new sandwich tray! I found it in a fun gift shop on a recent trip to Brussels, Belgium. That shop reminded me of one of my favorite shops in Edmonton that closed last year, The Tin Box. I knew as soon as I saw the tray, it needed to come home with me and fulfill its purpose of serving up delicious sandwich meals. 

How awesome is this tray?! 


Happy Sandwich Making! Crunch!

Wednesday, February 4, 2015

Ciabatta Goodness

Can you pronounce ciabatta?

It’s a tricky one – the ‘ci’ is actually pronounced like ‘chi’, so to say the name of this lovely bread correctly, try ‘chi-batta’. I actually looked up how to pronounce it – thank you Macmillan Dictionary and your audio clips for pronunciation!

Fresh Ciabatta Goodness!
This sudden attention to the pronunciation of foreign words is a result of the intensive English Teacher training course I recently completed at the International Language Center in Paris. I can now apply for English teaching positions and the world is wide open to me once again!

During my course, I brought my lunch from home as much as possible. This was helpful to save money, since buying lunch everyday can be expensive, and to save time, especially on those afternoons when I was teaching. I often brought homemade sandwiches made with ciabatta bread and stuffed with my favorite sandwich innards: multiple types of meat and cheese, veggies and mustard.

Stacked and Packed!
I can get fresh ciabatta bread  at my local grocery store and one loaf can make multiple sandwiches, depending on the size of my appetite: 3 small or 2 large. Ciabatta is lovely bread, crusty on the outside, soft on the inside, with lots of nice little nooks and crannies to hold reserves of mustard. It’s a worthy alternative to the baguette and it makes some pretty amazing sandwiches, both fresh and toasted.

A medley of goodness and ingredients
Possible ingredients for some Ciabatta Goodness include:

Meat: Ham, salami, sausage, roast beef, roast chicken or turkey
Cheese: Emmental, gouda, camembert (so good!)
Veggies: Feuilles de chêne (salad greens), arugula, spinach, avocado, red pepper, tomato, etc.
Condiments: Butter, mustard (multiple kinds in the same sandwich!), mayo

Prep:

1-Cut a fresh ciabatta loaf in half, length wise.
2-Spread butter and/or mustard on the halves, alternating or combining as per your tastes.
3-Pile on your choice(s) of meat(s) and cheese(s).
4-Top with veggies.
5-Assemble the top half of the loaf.
6-Cut to your desired size and number of sandwiches.
7-Serve and enjoy!

One Ciabatta Loaf = Multiple Sandwiches!
To create a tasty toasted ciabatta sandwich, place both halves of the bread (after the meat and cheese are in place, but before adding the veggies) in the oven under the broiler for 2-3 minutes. Remove from heat, top with veggies, cut and serve!

Tasty and Toasty Ciabatta Sandwich
This sandwich was a conversation starter among my new classmates during my course and it was extremely filling to eat for lunch. It also works well at sandwich parties or potlucks, where there are lot of fun ingredient combinations to play with. We brought some ciabatta to a recent gathering of sandwich lovers (friends) and they were a big hit there too.

So give it a try with your favorite ingredients and when someone asks you about your sandwich, because they will, tell them it’s all in the ciabatta bread and help them pronounce it correctly.


Just don’t talk with your mouth full!

Upside-down Ciabatta Goodness.

Tuesday, September 2, 2014

La Baguette de Notre Dame

Bonjour!

I moved to Paris, France two weeks ago and the first bite I took of that crusty, crunchy yet soft, so-fresh-it’s-still-warm baguette, I exclaimed:

“Yes, I think I can live here.”

I don’t even think I’d swallowed that first bite yet when I said that. I was jet-legged and fighting a cold I’d had since mid-July, but hell if I was going to let that hold me back from appreciating the wonder that is the French Baguette.

In Paris, you are rarely ever more than a block away from a boulangerie and the one French stereotype that actually has some truth to it is the French carry their baguettes everywhere. Seriously - by hand, poking out of the shopping bag or purse, stuffed into a bicycle basket – baguettes are everywhere! They are made so fresh and taste so good that they don’t last longer than a day, which is why the French carry them everywhere because they buy one every day.

Then, there are the French sandwiches! 

Beautiful French sandwiches at Sur le Pouce.
The most common sandwiches are a demi-baguette (half the length of a regular baguette) stuffed with the simplest of ingredients: some meat, some cheese, one or two vegetables and some butter. That’s it. I was surprised at the lack of condiments from the place that invented Dijon mustard but with such fresh bread as the heart of the sandwich, you really don’t need much else – just a place to relax and eat your sandwich.

Somewhere like the great Cathédrale de Notre Dame.

La Cathédrale de Notre Dame.
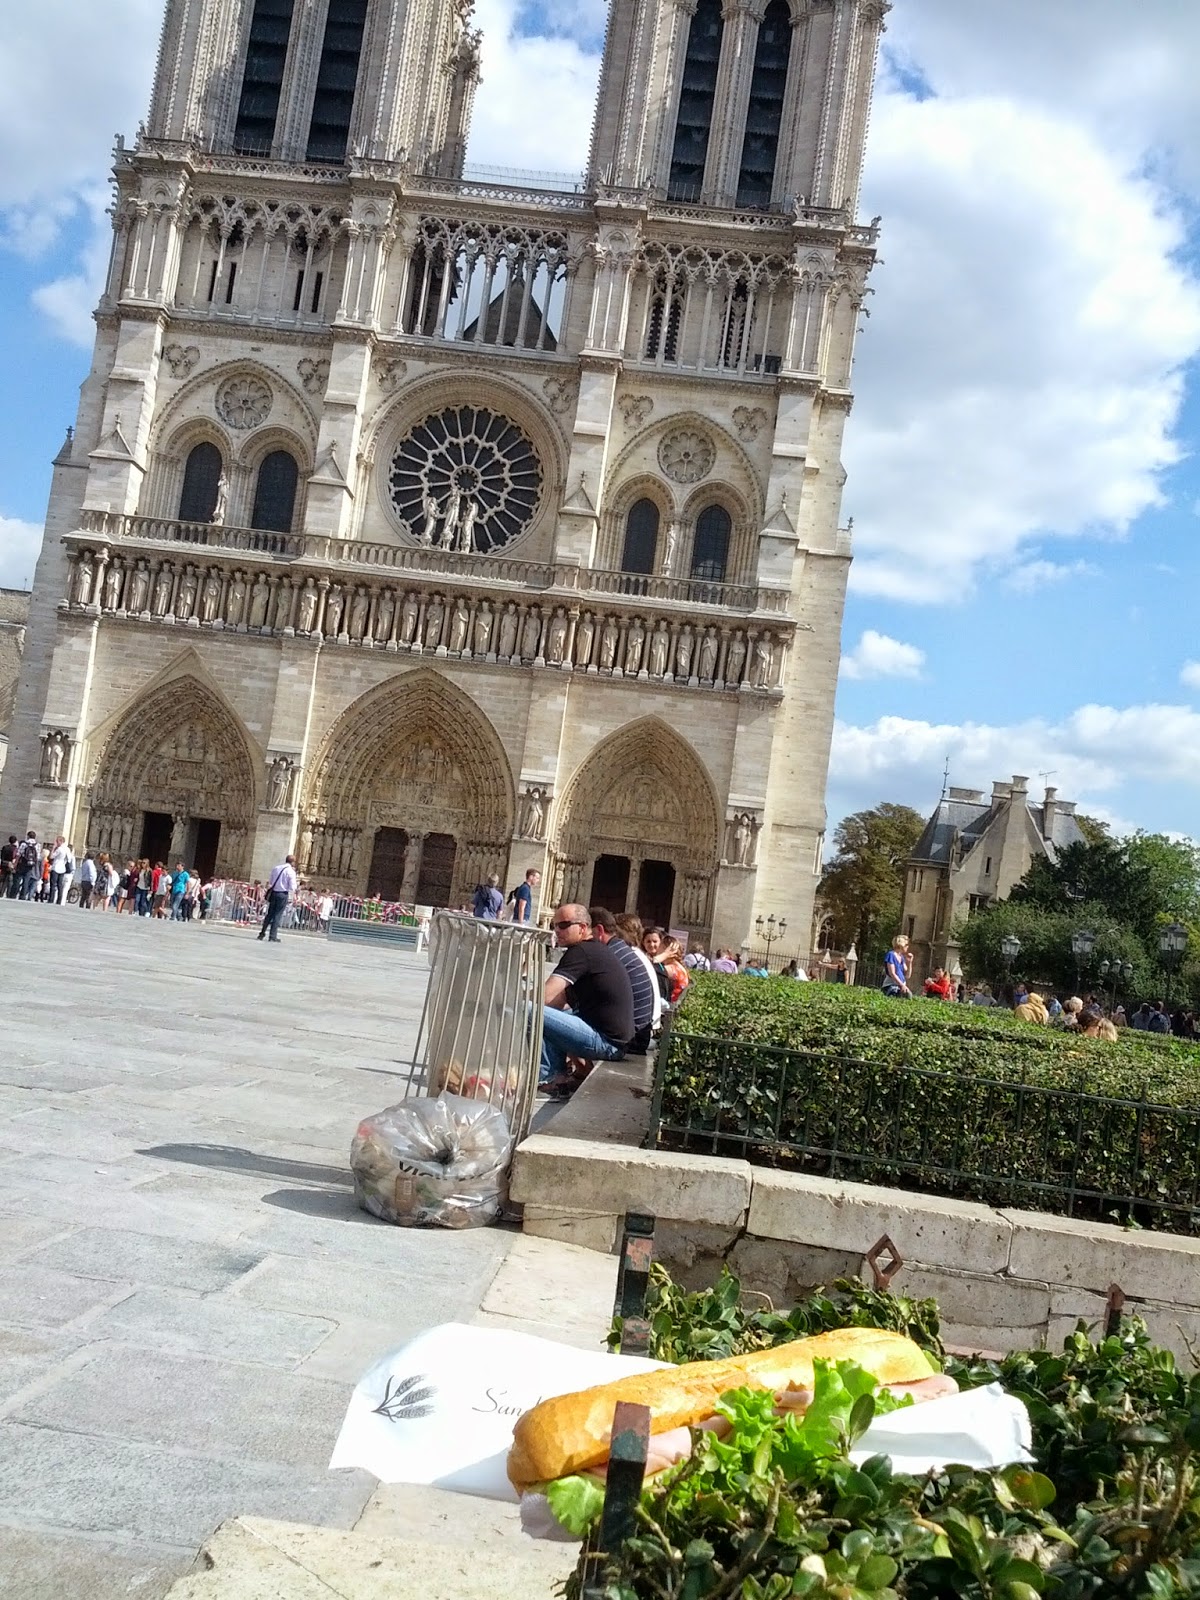
Following my exploration of Papier+, a pristine stationary shop on rue de Pont de Louis Philippe in Le Marais, I was getting hungry. I remembered a small snack/sandwich café near Notre Dame from another day of exploring and I realized I knew how to retrace my steps back to that place, so off I went! I hopped back on the metro at Saint-Paul, got off one stop later at L’Hotel de Ville and crossed the Pont d’Arcole towards Notre Dame. I found Sur le Pouce, the restaurant I noticed from the other day and admired the beautiful sandwiches at the street-side counter and I chose Jambon et Fromage. Then, with my sandwich tucked under my arm, I set off to find a place to sit near the cathedral.

Across the main square, I found my spot and perched myself on a cement corner near some bushes and munched away. Surrounded by tourists taking photos of themselves and the one of the most famous churches in the world, I was nearly flat on my stomach, trying to get the perfect shot of my sandwich nestled on the bushes with Notre Dame in the background.  I had to laugh out loud but I got some good photos for my efforts.

Money shot!
 Notre Dame is impressive from any angle but I love to admire it from the front. It’s so grand and majestic, it makes the swarms of people around it look small. My sandwich done, I headed back to the metro station but not before I bought some lemon sorbet from Sur le Pouce and ate it in front of L’Hotel de Ville. Yum!


Not a bad view of L'Hotel de Ville. 
Turns out eating lunch and desert in front of some amazing historic buildings makes for a pretty great day. 

Soon to be repeated, no doubt!

Friday, July 11, 2014

Made In Canada

Happy Summer Sandwich-Lovers, and I hope your Canada Day 2014 was wonderful!

Canada Day has always marked the beginning of summer with some sort of party or BBQ. When I was growing up, my family of teachers would almost always head down to my grandparents’ house in Olds to celebrate the end of the school year and my cousin’s birthday. Now as a teacher myself, I appreciate the gloriousness of July 1 even more and the party/BBQ tradition has continued – I have even hosted! Canada Day is always a great day to get together with friends and family, wear the red and white and eat/drink all in the name of summer and patriotism.

Since my husband and I are moving to France next month, there is a good chance this July 1 marked the last Canada Day we’ll spend in Canada for a while. This upcoming move is definitely an exciting opportunity for us both and the support from our family and friends continues to be amazing.  We are definitely looking forward to the adventure but still, it’s a bit bittersweet.

I am, and always will be, a proud Canadian and moving away from the True North Strong and Free won’t change that. We will find new ways to celebrate - there’s a rumor that the Eiffel Tower is lit up red and white on July 1 – and we’ll make new traditions. But I am certain there’s one thing that will never change, regardless of where we are and that’s the tradition of eating great food with great people.

To mark this special Canada Day, I made a delicious sandwich of all-Canadian ingredients and my favorite Oh Canada Cookies.  Enjoy!

All-Canadian Ingredients for this sandwich!
The Made In Canada Sandwich needs:

Dempster’s Whole Grain Canadian Bread
Maple Leaf Natural Selections Turkey and Ham
Maple Leaf Bacon
Sobey’s Sensations Canadian Cheddar
French’s Mustard (not actually a Canadian brand but it works to honour French as one of our official languages)
Mayo
Lettuce and Radishes (from our own garden!)  


Prep:
1-Cook the bacon according to your preference for crispy/soft. Drain on paper towels and set aside. (Remember, don’t pour the grease down the sink!)
2-Toast the bread.
3-Spread the mustard on one piece of bread, the mayo on the other.
4-Layer on the turkey, ham, cheddar and bacon.
5-Top with radish slices and lettuce.
6-Slice and serve with some Oh Canada Cookies and your favorite cold beverage.

The recipe for the Oh Canada Cookies is a basic sugar cookie recipe from an old issue of Inspired, the free magazine Sobey’s used to put out a few times a year. I like this recipe because it’s really simple and easy to adapt to make other kinds of sugar-cookie type cookies.

All these Maple Leaves need is their red!
You will need:
2 butter sticks, or 1 cup of butter, softened (I leave the butter out for several hours to get really soft)
1 cup white sugar
1 Tbsp vanilla
1 egg (the original recipe says it should be warmed to room temperature, but I don’t think it makes a huge difference either way)
2 ½ cups of flour
Electric or stand mixer

Cookie Prep:
1-Combine the butter, sugar and vanilla and mix until smooth.
2-Add the egg and continue mixing*.

*It’s very important to add the egg BEFORE you mix in the flour. I learned this the hard way and ended up with very flaky and crumbly dough. It ended up being alright eventually, but it meant I had to spend more time kneading the dough so it wouldn’t crumble when I tried to roll it out.

3-Add the flour and mix until a dough forms.
4-Knead the dough in the bowl with flour-covered hands until smooth.
5-Place dough ball in a covered bowl and chill for at least 20 minutes.
6-Roll dough out to desired thickness. (Some people like to cover the dough in parchment paper to do this. It’s up to you.)
7-Use a Maple Leaf cookie cutter to cut out the beautiful cookies. Leave some space between each cookie on your baking sheet  
8-Bake at 350F in the middle of the oven for 10-12 minutes.
9-Transfer cookies to a rack to cool completely before decorating.

Oh Canada Cookies with red maple butter cream icing.
While the cookies bake, make the Red Maple Butter Cream Icing:

1-Mix ½ cup softened butter with 2 cups icing sugar.
2-Add ½ tsp maple syrup (more if you like!) and 2 Tbsp milk or water.
3-Mix until desired smoothness; add more icing sugar or liquid if required and 3-4 drops of red food colouring.

To 'set' the icing, I recommend chilling the cookies in the fridge for 15-20 minutes.


The sandwiches and cookies were devoured while we watched the newest music video from Canada’s favorite astronaut, Col. Chris Hadfield and his brother Dave. If you haven't seen it yet, you're in for a treat! 


Then, we went to Telus Field to watch the Edmonton Prospects baseball game with some friends. Our seats also gave us prime view of the fireworks and the much anticipated light-up of the Highlevel Bridge.  What a show!

It was a spectacular summer night celebrating this amazing country that I will always call my home no matter where I am.  Next summer, we will celebrate Canada Day in Europe. We’ll wear our red and white, we’ll play some Rush or Tragically Hip, and we’ll be with friends - Canadian and European.  I hope they will enjoy this small taste of Canada.

I hope you enjoy it too. Je t’aime, Canada! Cheers!

Made in Canada Sandwich and Oh Canada Cookies.


Monday, June 16, 2014

The Monte Cristo

Monte Cristo Sandwiches: a play on the Croque-Monsieur.
Sandwich Night is not a new concept in my house – it’s a fairly common occurrence, thanks to this blog. The type of sandwich obviously varies, depending on what ingredients are handy and how ambitious I feel.  Last night, ambition was high and so was the excitement level regarding our upcoming move to France. We were feeling French, so it felt like the right time to introduce ourselves to a new sandwich: The Monte Cristo.

The Monte Cristo traditionally is made with ham and cheese, coated in egg and fried. Sound a lot like French Toast, minus the ham and cheese? That’s because it’s also a spin-off of the French sandwich, the Croque-Monsieur, which will get its own post, naturellement.

I was intrigued by its origins, as I am with all the well-known sandwiches I make, so I did a little digging into its past. The Monte Cristo is believed to have been first served in Paris in 1910 and gained popularity when it was served at Disneyland restaurants in the mid-1960s. Apparently, it’s still on the menu at the Tahitian Terrace. It is not to be confused with The Count of Monte Cristo, an adventure novel from 1844 by Alexandre Dumas, unless you consider the joke that in France, this sandwich is served ‘with a vengeance’.

Ooh, la la!

To serve up your own Monte Cristo, you will need: 

-Sandwich bread, your choice (traditionally, it’s made with white bread, but I used a thick rye)
-Strong Cheddar cheese, sliced
-Turkey or Ham slices
Simple ingredients: eggs, milk, bread, mustard, cheese, meat.
-Whole grain Dijon Mustard
-2/3 cup of Milk
-3 Eggs
-1/4 tsp. each fresh Pepper and Thyme leaves
-Butter
-A hot skillet

Prep:

1-Spread a layer of mustard on half of the bread slices.
2-Top with cheese and turkey/ham slices and the other, non-mustard-ed bread slices.
3-In a mixing bowl, beat the eggs, milk, pepper and thyme together.
4-Carefully dip the sandwiches into the egg mixture to coat each side.
5-Melt the butter in the skillet and grill the sandwiches 3-4 minutes each side, until brown.
6-Serve hot, with ketchup, ranch dressing or jelly, as its traditionally served with, for a little extra something sweet.

Très bien!

This fancy French sandwich needs a knife and fork.
I really liked the different textures and flavours of this sandwich: the egg batter made the bread soft but also a bit crispy around the edges and the smoked turkey and strong cheddar complimented themselves well. And in my opinion, everything tastes better with Dijon mustard.

This is a knife-and-fork sandwich, since it’s best when it’s hot off the skillet and feels fancier eating this repas français with utensils. My only recommendation would be to layer the turkey/ham between two slices of cheese for maximum cohesion while grilling. The numerous cheese possibilities are also definitely worth playing with: Gruyere or Emmental would be the top two on my very long list….

Vengeance optional, but couldn’t hurt for authenticity’s sake.  Bon appétit!

For more information on the Monte Cristo, check out:


Tuesday, March 4, 2014

Green Eggs and Ham Sandwich

Classic Dr. Seuss: try something new and you may like it!
Do you like Green Eggs and Ham?

Let’s go make some, Blog-I-Am! 

March 2, 2014, marked the late, great Dr. Seuss’ 110th Birthday!  He was born Theodor Seuss Geisel and is still beloved by children and adults alike around the world for his quirky, imaginative and surprisingly profound children’s books. 

When I think back on some of my ‘learning to read’ memories, Dr. Seuss is there, right along with Robert Munsch, Shel Silverstein and Beatrix Potter. Green Eggs and Ham was a classic (probably because I was such a picky eater) and we always watched How the Grinch Stole Christmas during the holidays. The speech of the valedictorian of my high school graduating class was even interspersed with excerpts from Oh, The Places You’ll Go. There was not a dry-eye in the house...

Dr. Seuss has been part of my journey through childhood, young-adulthood, auntie-hood and teacher-hood. As an auntie to two amazing little boys, we’ve spent hours reading aloud together and nothing is more fun than stumbling through the tongue-twister masterpiece Fox in Socks while a little four year-old giggles uncontrollably! Even the older kids in my life love to get ‘Seussified’, like the Junior High students I directed in The Seussification of Romeo and Juliet, the Drama 7 class that brought The Lorax to life, and the English 10 class who enjoyed listening to Green Eggs and Ham. Those almost-too-cool high school students didn't even notice they’d transformed back into kids while I read to them.  Plus, it helped them understand the tricky concept of theme.

To honor the birthday of the man whose books hold a special place in my heart, as they do in the hearts of so many others (Beatrix Potter herself included!), I was inspired to recreate the most famous, oddly-colourful food in sandwich form: Green Eggs and Ham!

You do not like them. So you say.

Try them! Try them! And you may.

Green Eggs and Ham ingredients!
For this Special Literary Lunch, you will need:

Eggs (for two sandwiches, I used four eggs)
Ham
Sandwich Bread, toasted
Chopped Green Pepper
Fresh Dill, finely chopped
Green Food-Colouring (a few drops)
Mustard
Mayo
Ground Pepper
Swiss cheese (for the Mouse, while you enjoy it in your House)

How to make them here or there, how to make them anywhere:

1 – Crack the eggs in a skillet over medium-heat.
2 – Keep them moving by constantly stirring them in the skillet to avoid burning/sticking and add the green pepper and dill.
3 – Squeeze a few drops of the green food colouring onto the eggs while they’re still runny and keep stirring them to set the colour.
4 – Divide the eggs into sandwich portions and remove from heat. Bread should be toasted now to avoid drying out.
5 – Spread some mayo and mustard on the toasted bread and place the eggs and cheese on one slice.
6 – Arrange the ham (the damn ham, as Scout Finch from To Kill a Mockingbird might say) on the other slice and sprinkle with dill. (Or if you want to dye your ham green too, go for it!)
7 – Assemble the sandwich and slice for easy eating.

Seuss-tacular! 
Ready for lunch! Munch, munch, munch!

The crisp, faintly bitter flavor of the green pepper contrasts nicely with the sweet, slightly tangy taste of the dill – much like the up-beat, optimistic Sam-I-Am and his bitter counterpart. The melted cheese and the sharp tinge of mustard combine with the other ingredients at just the right moments; just as the profound themes of Dr. Seuss’ stories don’t overpower the plot, they are subtle, yet truthful.

Plus it’s just so much fun to eat a Green Eggs and Ham sandwich! My inner four year-old was giggling along with my adult-self.

You can eat them in a box, with a fox, in a house, with a mouse. 
You can eat them here or there, you can eat them anywhere!
If you try Green Eggs and Ham, you may like them, Blog-I-Am!

I do so like Green Eggs and Ham!
Some fun, little-known facts about Dr. Seuss:

*He wrote Green Eggs and Ham on a bet with his publisher that he could write a book using only 50 different words.  He won when it was published in 1960 and it remains one of his best-selling books.

*If I Ran the Zoo, published in 1950, introduces the word nerd. Thanks, Doc!

*Many of Dr. Seuss’ books have a political bent: Yertle the Turtle, 1958, opposes tyrannical dictators, The Sneetches and Other Stories, 1961, decries racism and Antisemitism and The Lorax, 1971, warns of the dangers of exploiting the environment.

*Due to its political themes, The Lorax has been on the American Library Association’s Annual List of Banned Books.  Who knew?

*Dr. Seuss was awarded in the Pultizer Prize in 1984.

For more Seuss titles and info, check out:


Happy Reading and Eating!


Wednesday, January 8, 2014

3 Parts Mustard/2 Parts Pickles/1 Part Ham

3 kinds of mustard, 2 kinds of pickles...that's how I remade an otherwise ordinary ham and cheese sandwich.  

The experimental process
With lots of traveling over the Christmas holidays and getting the house back to its pre-holidays mess, cooking a nice, grown-up dinner just wasn't in the cards last night.  Thankfully, there was lots of leftover baked ham (sent home with us in a huge care-package from the farm from my amazing mother-in-law!), half a loaf of homemade bread, some veggies and lots of condiments in the fridge to work with. 

Since ham and cheese is pretty basic, I tried experimenting with combinations of mustard and pickles to dress things up.  What I discovered was a hot and savory mix! 

For my 3 Parts Mustard/2 Parts Pickles/1 Part Ham creation, I used:

French's Original Dijon
Sensations' Whole Grain Dijon (I love its grainy texture)
French's Class Yellow Mustard 
Unico Pickled Hot Pepper Rings
Bick's Sandwich Saver Dill Pickles
Baked Ham, sliced
Mayo
Baby Spinach
Plum Tomatoes, sliced
Marble Cheese slices
Brown Bread
Fresh Ground Pepper

Cast photo! Missing the Grainy Dijon, which was finished off.
Tips:
  1. Combine the Original Dijon and Grainy Dijon on the same bread slice to make a Super-Dijon Mustard! 
  2. Spread the mayo and the Classic Yellow on the other bread slice to balance it all out. (For an even bigger kick, I dare you to try Keen's Mustard instead of the Classic Yellow; it's my favorite hot mustard and it would bring this sandwich to a whole new level!)
  3. Pile on the other ingredients and don't skimp on the spinach and hot peppers!
  4. Add some fresh ground pepper before fully assembling.
  5. Enjoy!
Spicy and grainy mustard combined with hot and garlicky pickles really rebooted this sandwich, which proves that having fun with the classics is all about the condiments.  

What's your favorite condiment combo? Leave me a comment and let me know!